Furniture
Bench
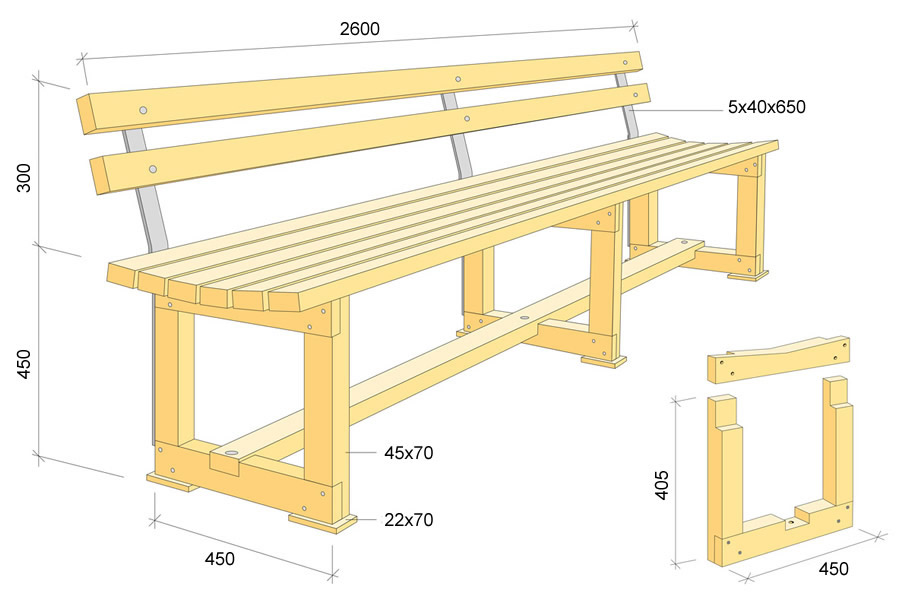
The bench can be as long as you like. If it is longer than 2,600mm you will need more than two sets of legs. Only one size of timber is used – 45 x 70mm, planed and pressure-treated to Use Class 3u.
First, make the legs. Cut the end of each leg piece so it fits together with the next in a half-and-half joint. Cut a recess in each bottom bar to take the stretcher. Glue and screw each corner together using four screws, two from each side. Shape the top bar so that the seat will be slightly concave. Fix the stretcher to the legs using coach bolts.
Attach small feet made of timber pressure-treated to Use Class 4 to the leg pieces. If the bench is going to stand on grass, it may be appropriate to use a base of concrete paving slabs. Smooth the edges of the seat slats and screw into place from above. Use brass screws with a countersunk head, or plug the holes. Moisture-proof glue in the joints between the seat and leg pieces helps prevent moisture getting in. Position the front and rear slats so that they overhang the front and back of the base by a few centimeters.
Screw the seat back firmly to the bench with sturdy galvanized flat iron fittings. The ribs in the back are fixed with coach bolts. The flat bars are bent at an angle of approximately 20°. The bench can stay outside all year. To protect the wood surface and prevent small cracks, finish with wood oil. Take special care finishing endgrain – use oil, endgrain sealer or wood preservative.
| Item | Size | Length mm (Drawing dimensions) | Number |
|---|---|---|---|
| Trestles | 45 x 70 | 450 | 6 |
| Trestles | 45 x 70 | 405 | 6 |
| Feet | 22 x 70 | 95 | 6 |
| Seat | 45 x 70 | 2600 | 6 |
| Stretcher | 45 x 70 | 2400 | 1 |
| Back | 45 x 70 | 2600 | 2 |
| Flat Iron | 5 x 40 | 650 | 3 |
| Coach Bolt | 8 | 60 | 6 |
| Coach Bolt | 8 | 90 | 3 |
| Wood Screws | - | - | - |
Tables & Chairs
Use planed pine, pressure-treated to Use Class 3 and 1.7x40mm hot galvanized nails, or brass screws with a countersunk head. Pre-drill all nail holes to prevent the wood cracking. Using moisture-proof glue in the joints enhances the structure and stops water getting in. Cut the pieces to the specified dimensions.
Take care when measuring and marking. Some parts, such as table and chair legs, can be cut a few centimetres proud. When the table and the chair is assembled, trim the lower ends to the correct angle to sit flat on the ground. The exact angle of the chair back can also be adjusted in this way.
Before assembly, sand all elements carefully using a block. Round off sharp edges and corners. Use a paint can as a template for rounding corners.
Use an electric band saw, jigsaw or bow saw with a fine blade for cutting shapes.
To make the furniture foldable, you’ll need four carriage bolts (screw with M-thread round head) with locking nuts and washers for the table and eight for each chair, diameter 8mm, length 80mm. Use two 120mm long bolts between seat parts 10, 12, 13. Drill the holes so that the square flange of the bolt is secure.
Table
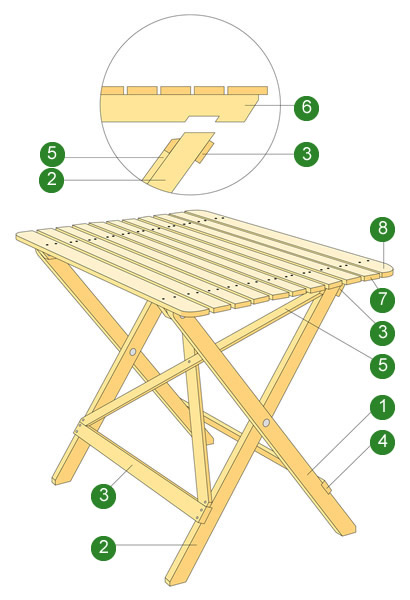
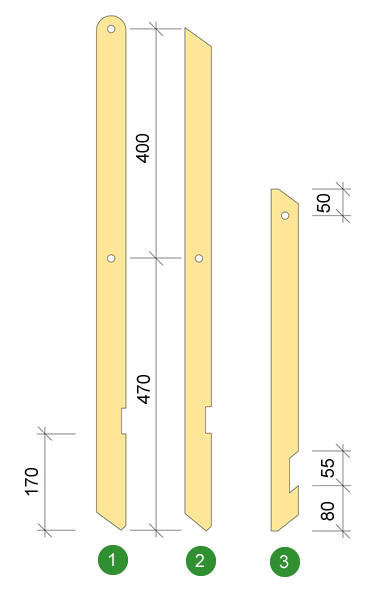
The table has two pairs of legs [2]. The tops of the legs lock into notches in the table frame [6]. A crossbar [3] is nailed across the top of the legs so that it abuts the table frame, letting the legs slot into the notches. The two slats at each end of the table are wider than the others. The height of the table is approximately 750mm and the top is approximately 620mm x 1,000mm.


Chair
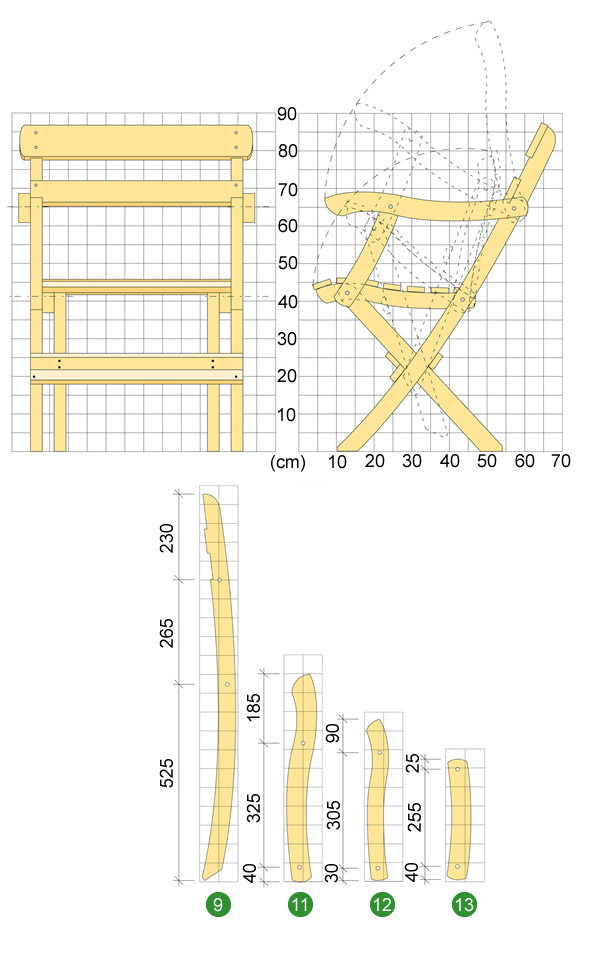
The construction is more stable if all the stretchers and backrests fold into the leg to a third of its thickness. Mark the notches carefully, preferably with the help of a set square. Make two straight cuts and cut away the wood with a chisel. Finish with a flat file.
If the seat slats are wider, make the gaps narrower.
The chair’s pivoting parts [9 and 11] are made from 34 x 95mm timber, [12 and 13] from 34 x 70mm timber. The cutting system is 50 x 50mm.
The chair has four pivoting joints. Before drilling the bolt holes we recommend you test whether the chair folds properly on a chair side, using a narrow pin instead of the bolts. You can also check the correct seat height and other elements. The chair’s seat height is about 450 mm.
| Name | Dimension | Length | Quantity |
|---|---|---|---|
| 9 Leg | 34 x 95 | 1020 | 2 |
| 10 Leg | 34 x 95 | 615 | 2 |
| 11 Armrests | 34 x 95 | 550 | 2 |
| 12 Seat Frame | 34 x 70 | 425 | 2 |
| 13 Arm Supports | 34 x 70 | 320 | 2 |
| 14 Seat Slats | 16 x 45 | 488 | 7 |
| 15 Back Slats | 16 x 95 | 605 | 1 |
| 16 Back Slats | 16 x 70 | 556 | 1 |
| 17 Stretchers | 16 x 45 | 556 | 3 |
| Coach Bolts | 8 | 120 | 2 |
Surface Treatment
Use wood that has been preservative treated to Use Class 3. Treat carefully with wood oil, or with alkyd oil paint. Use wood preservative on any cut or notched surfaces – particularly the feet, which suck moisture from the ground. To counteract, soak the feet for a day in a jar of preservative. If painting, use a primer followed by two topcoats of paint specially formulated for external timber. Do not paint wood that has a moisture content higher than 16%. Use an electronic moisture meter to check Moisture Content. Paint the table and chair elements before assembling.
The chair has four pivoting joints. Before drilling the bolt holes we recommend you test whether the chair folds properly on a chair side, using a narrow pin instead of the bolts. You can also check the correct seat height and other elements. The chair’s seat height is about 450 mm.


